Create an OKR for an Employee
In this lesson, we will look at how you can assign a personal OKR to an employee. Objectives within the platform can become quite complex with several different variables so we would recommend that you look at the various objective-related lessons in the University to make sure that you are getting best use of the platform.
This lesson focuses on creating an OKR which is a collection of objectives (key results) which can be of different value types. Whereas SMART objectives are a singular objectives with one value of measure.
Objectives can be created from scratch, or from a pre-defined template (if your StaffCircle administrator has configured these for your platform). This lesson will cover both methods.
Creating an OKR from Scratch
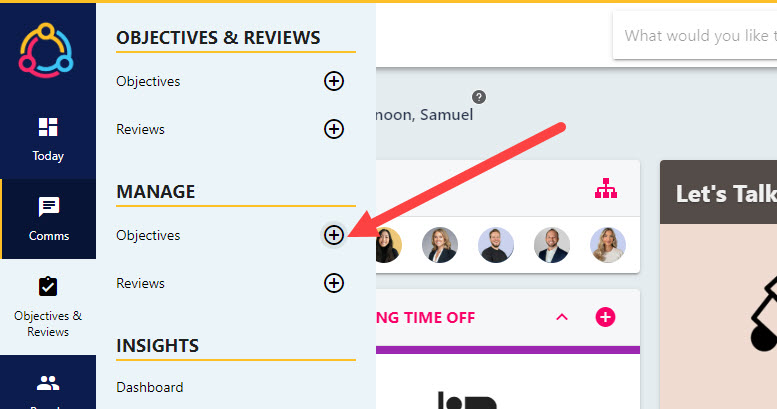
Step One
Hover over the Objectives and Reviews section of the side-bar, then navigate to: Manage ➡️Objectives. Select the ➕ next to Objectives to open the ADD OBJECTIVE pull-out drawer to the right-hand side of the page.
Step Two
Within the Add Objective drawer, you will see a collection of tiles. Click the Objective Key Results tile to start the process of creating an OKR.

Step Three
Under the type of objective, select the ‘Personal’ tile as indicated by a single-person icon, this is because you are assigning this OKR at an employee/personal level.

Step Four
Select a competency for the objective. If this does not apply, or your company is not using the Competency feature then select the ‘No competency required for this objective‘ tile to proceed to the next stage.
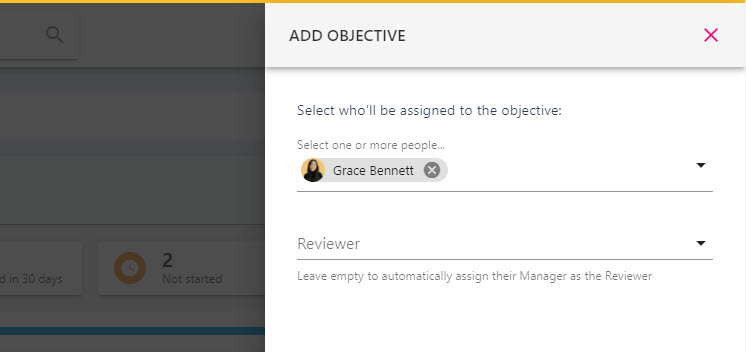
Step Five
You will now need to assign the objective to the employee from the ‘Select one or more people‘ drop-down menu.
If you are assigning this objective to more than one employee, you can select multiple employees from the drop-down field. This will default to ‘duplicating’ objectives for these employees and they are not linked in any way. This process simply prevents you from going through the process multiple times when assigning the same objective.
The Reviewer will default to the employee’s manager, however you can select another name from the drop-down field to change this to another individual.
Select the NEXT button at the bottom of the page to move on to the next screen.
Step Six
Now select the start and end dates for the objective, this will determine when you would like the employee to start working towards the OKR, and when you would like the OKR to be completed by (due date). Use the date picker to amend the ‘Date starts‘ and ‘Date ends‘ fields accordingly.
If you wish to apply a reoccurrence to the objective, you can so by ticking the ‘The objective should recur’ tick-box. Then select the frequency of reoccurrence (i.e days, months, years).
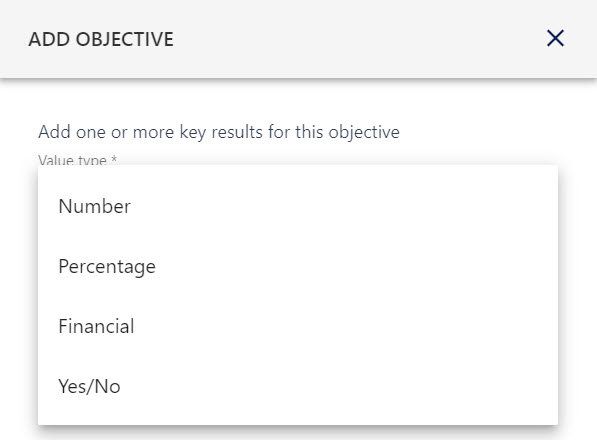
Step Seven
You can now start to add your key results. These are the smaller objectives which sit underneath the OKR.
To add a key result to the OKR, select the value type – this is how the key result will be measured: percentage, number, financially, or yes/no.
Step Eight
Specify a title and description to the key result. The title should briefly summarise what the objective as about.
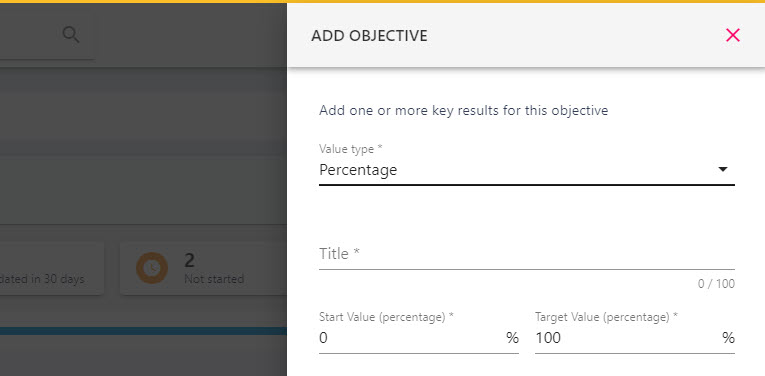
Then enter the start and target value for the objective. For example, for a percentage objective you may choose 0 as your start point, and 100 as your end point (0-100%). You may wish to refer to the table below as a guide.
| Measure Type | Objective Example | Value |
|---|---|---|
| Number | Make 150 outbound calls | 0 – 150 |
| Percentage | Complete an online security course | 0% – 100% |
| Financial | Make £10k in revenue | £0 – £10,000 |
| Yes/No | Read Employee Handbook | Yes/No |
An objective does not need to start at 0, for example if your customer satisfaction rating was at 57% and you were looking to raise this to 85% then we would recommend putting 57 as the start value, and 85 as the target value. StaffCircle will calculate the range between these two numbers as 100%, and this will be illustrated in the progression bar as the objective progresses.
Step Nine
You can share this key result with another person in the organisation by toggling on the ‘Share this key result (sub objective) with someone.’ This will allow two or more employees to collectively work towards the key result/objective.
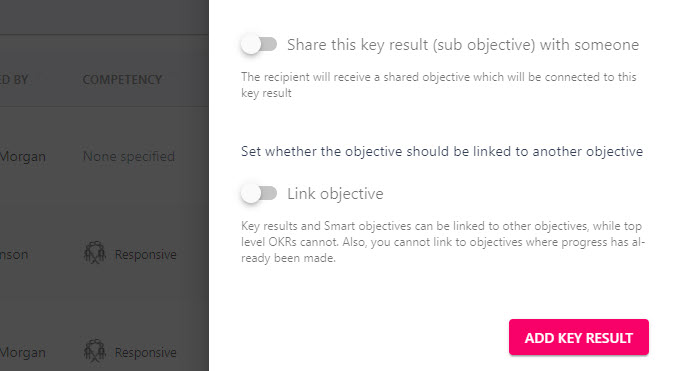
You can toggle on the ‘Link Objective’ button to link this personal key result to a Departmental objective – this can be a key result from a Departmental OKR, or a Departmental SMART objective. Use the drop-down to select the departmental objective/key result. You may wish to refer to this lesson for further information on linking objectives.
When linking objectives, the value type must be the same. For example, if the personal key result is measured financially, then the departmental objective/key result must be measured financially. Remember to link the personal key result to a department-level objective, your departmental objective must already exist within the system.
Step Ten
Click the ‘Add Key Result’ button to add the key result to the OKR. To add further key results – repeat steps nine, ten, and eleven.
You can add more key results to the OKR after the OKR has been created, however at least one key result must exist in order to create the initial OKR.
Once you have added all of your key results, click the NEXT button to move on to the summary page.
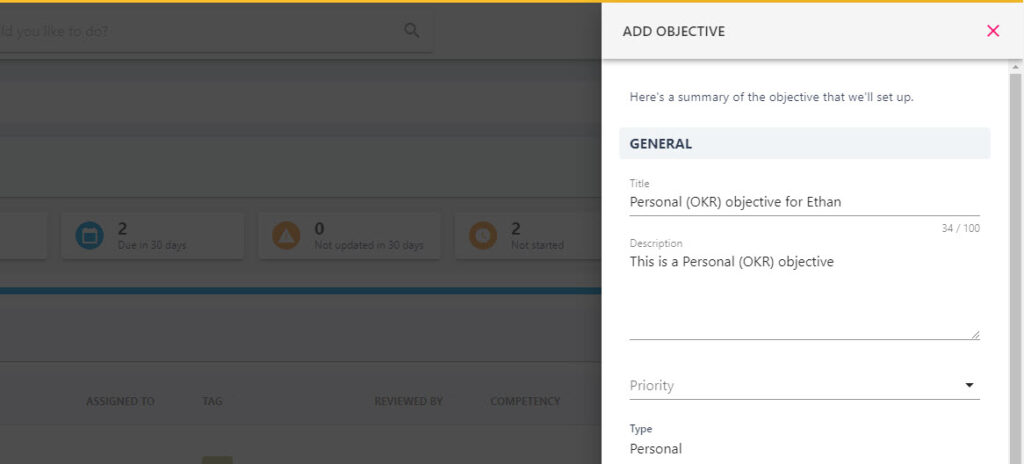
Step Eleven
This is the final page of the Add Objective pull-out drawer where you can give a title and description to the OKR. The title of the OKR should briefly summarise what the objective as about , whereas the description should provide more context if required.
On this screen you can also set a priority for the objective, however, this is not a mandatory field.
Step Twelve
Click the ‘Save’ button in the bottom right-hand corner of the screen to assign the OKR to the employee.
The employee will receive a notification and this OKR will display in their Personal Objectives area when they log in to the platform. This objective will also be viewable in your ‘Manage’ objectives screen if you are the Reviewer, or have permissions to view this employee’s objectives.
Create an OKR from a Template
Step One
Hover over the Objectives and Reviews section of the side-bar, then navigate to: Manage ➡️Objectives. Select the ➕ next to Objectives to open the ADD OBJECTIVE pull-out drawer to the right-hand side of the page.
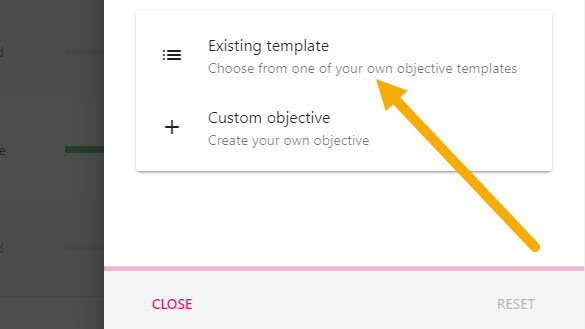
Step Two
Within the Add Objective drawer, you will see a collection of tiles. Scroll to the lower half of the drawer and select the ‘Existing template’ tile.
Step Three
Choose one of the objective templates from the list, all of which have been created by your system administrator. OKRs will contain a pink OKR tag next to it’s title as shown below.
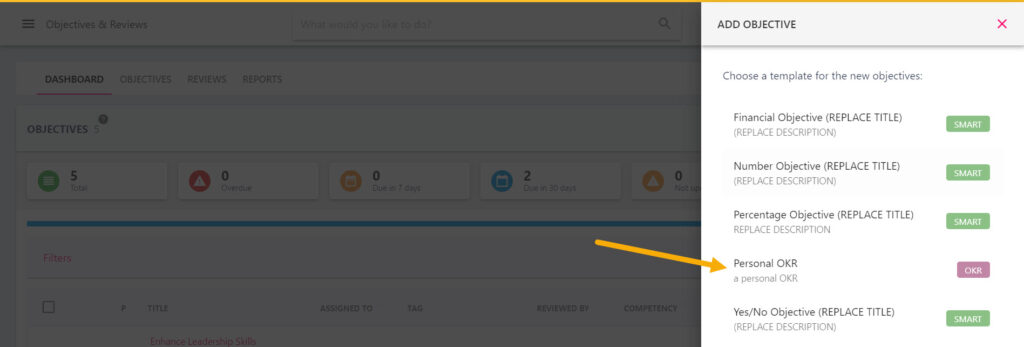
If you have any queries regarding which objective templates to use, please contact your system administrator for guidance.
Step Four
Update the fields within the form, noting that many of the fields will be pre-populated from the objective template. Descriptions of each field can be found in the table below:
| Field Name | Description |
|---|---|
| Title | The name or title of the objective. Ensure that this clearly summarises what the individual needs to achieve. |
| Description | A brief description to explain what the objective is about. This can include hyperlinks to specific web pages/online courses etc. |
| Tag | Allows objectives to be categorised, this is pre-populated from the template and does not need to be changed. |
| Type | The type of objective. For the purpose of this lesson, this should be a personal OKR. |
| Priority | Assign a priority level for the objective (i.e high, normal, low) |
| Competency | Link the objective to one of the company’s competencies. This will feed in to the employee’s success circle. |
| Person assigned to | The employee(s) who will be given the objective to work towards. Selecting multiple employees assign the OKR to each employee in the field – these will not be connected in any way. |
| Reviewer | The Reviewer oversees the progress and completion of the objective and will receive the associated notifications. Leaving this field blank will default the employee’s line manager. |
| Date Starts | The date the employee starts working towards the OKR. |
| Date Ends | The date the employee is required to complete the OKR. |
| Documents attached to this objective | Upload supporting documents to the objective for the attention of the assignee/Reviewee. |
| Allow manual progress changes | Allows the reviewee (assigned employee) and the reviewer to update the progress of the objective. |
| Allow conversation feature | Ability for the assignee/Reviewee to leave comments against their objective using the conversation feature. The conversation occurs only between the Reviewee and the Reviewer. |
Scroll to the bottom of the drawer and click the ‘SAVE’ button in the bottom right-hand corner to assign the OKR to the employee. Now that the OKR has been created the key results can be assigned.
Step Five
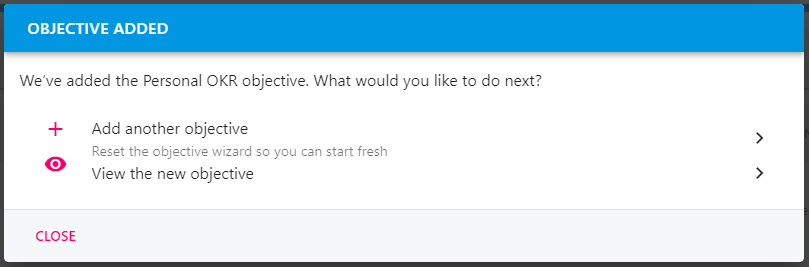
The next stage of the process is to add the key results to the OKR. A pop-up will appear in the centre of the screen once the OKR has been created, select View the new objective to open the Objective Details page.
Alternatively, you can open the OKR by selecting it’s title in the Manager Objective screen. You can use the filters bar to help you pinpoint specific objectives.
Step Six
Within the KEY RESULTS section of the details page, click on the plus ➕ button in the header to open the ADD KEY RESULT pull-out drawer to the right hand side of the page.

Step Seven
Select the value type from the drop-down – this is how the key result will be measured: percentage, number, financially, or as a yes/no. Examples can be found below:
| Measure Type | Objective Example | Value |
|---|---|---|
| Number | Make 150 outbound calls | 0 – 150 |
| Percentage | Complete an online security course | 0% – 100% |
| Financial | Make £10k in revenue | £0 – £10,000 |
| Yes/No | Read Employee Handbook | Yes/No |
Step Eight
Provide a title to summarise what the key result is set out to achieve. Remembering that a key result is a smaller objective which contributes to the overall key result (OKR).
Then specify the start and target value for the key result. The start value is the starting point for the objective and is typically 0. The target value is the target the employee is working towards, i.e 100%.
Step Nine
You can toggle on the ‘Link Objective’ button to link this personal key result to a Departmental objective – this can be a key result from a Departmental OKR, or a Departmental SMART objective. Use the drop-down to select the departmental objective/key result. You may wish to refer to this lesson for further information on linking objectives.
When linking objectives, the value type must be the same. For example, if the personal objective/key result is measured financially, then the departmental objective/key result must be measured financially. Remember to link the personal key result to a departmental objective, your departmental objective must already exist within the system.
Step Ten
Click the ADD button in the bottom right-hand corner of the screen of the drawer to add the key result to the OKR. This will now display under the KEY RESULTS section of the OKR details page.
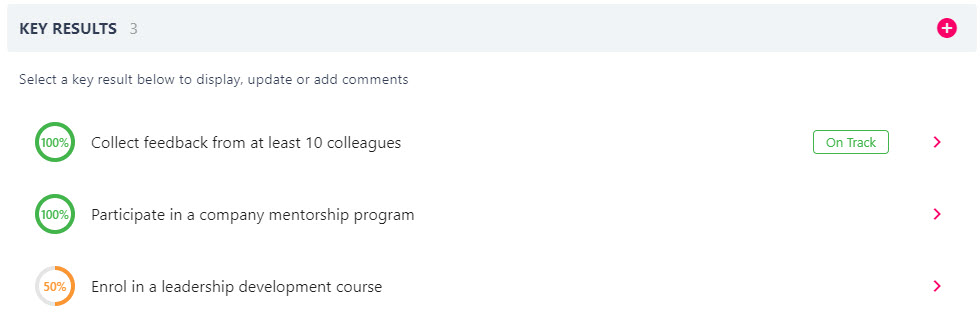
To add more key results to the OKR, repeat steps six to ten above. It’s generally recommended that an OKR should have between 3 and 5 key results.